Introduction
Overview of UTA's integration with the SAP digital payments add-on
Welcome to the United TranzActions (UTA) onboarding guide for the SAP digital payments add-on. This document provides step-by-step instructions for merchants and SAP administrators to configure UTA as a Payment Service Provider (PSP) within the SAP digital payments ecosystem.
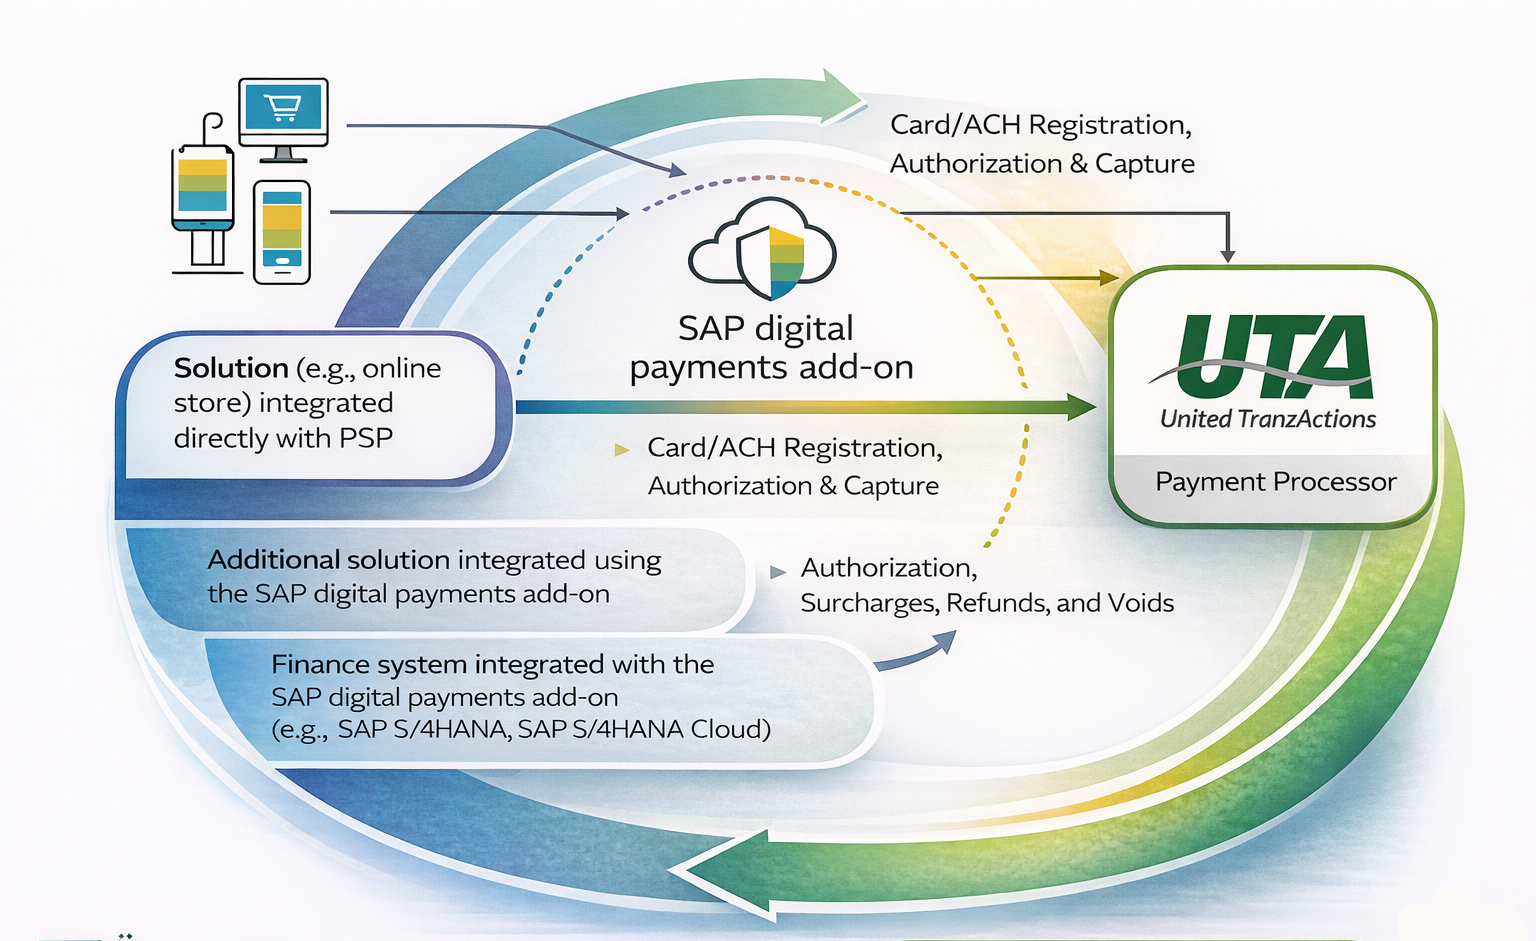
The SAP digital payments add-on serves as a central hub that connects SAP applications — such as online stores and finance systems — to UTA's payment gateway. Once activated, UTA handles secure, end-to-end digital payment processing, including card registration, authorization, capture, refunds, surcharges, and voids.
1.1 Integration Architecture
The diagram below illustrates how UTA fits into the SAP digital payments add-on architecture:
1.2 Supported Payment Functions
The following payment operations are supported through the UTA adapter for SAP digital payments add-on:
| Payment Function | Description |
|---|---|
| Card Registration | Tokenizes and stores card data securely for future transactions (Credit Card and ACH supported) |
| Pre-Authorization during Registration | Performs a soft authorization at the time of card registration to validate the card |
| Authorization | Requests approval from the card issuer to hold funds |
| Authorization Cancellation (Void) | Cancels a previously authorized transaction before settlement |
| Settlement / Capture | Captures previously authorized funds to initiate fund transfer |
| Refund | Returns funds to the cardholder for a settled transaction |
| Surcharges | Applies applicable surcharge fees to qualifying transactions |
1.3 Supported Card / Payment Types
UTA supports the following card brands within the SAP digital payments add-on:
1.4 Key Terms
| Term | Definition |
|---|---|
| PSP | Payment Service Provider — the entity (UTA) that processes payment transactions on behalf of the merchant |
| Tenant | A grouping of data for one organization or legal entity within the SAP digital payments add-on. Identified by a Tenant ID and Tenant Subdomain. |
| Tenant ID | Unique identifier assigned to your organization's SAP digital payments add-on environment |
| Tenant Subdomain | The subdomain name used to route requests to your specific SAP tenant |
| Merchant Account (MID) | The unique merchant identifier assigned by UTA to identify your processing account |
| Company Code | SAP organizational unit that represents a legal entity for accounting purposes |
| PSP Determination | SAP configuration that routes payment transactions to the correct PSP based on defined rules |
| Card Registration | The process of securely storing payment card details as a token for future use |
| Data Center | The geographic SAP BTP region where your tenant is hosted (e.g., US East — Virginia) |
Prerequisites
What you need before starting configuration
Before you begin the configuration process, ensure that all of the following prerequisites have been completed. Attempting to configure the integration without these items in place may result in errors or incomplete setup.
2.1 UTA Account Requirements
- An active UTA merchant processing account. Contact a UTA Sales representative if you're a new merchant or your Relationship Manager if you're an existing merchant.
- Provide the UTA representative with the UTA Merchant IDs (MIDs) that will be in use and enabled for the SAP digital payments add-on integration. If you do not know your merchant IDs, please contact your UTA Relationship Manager.
- Provide the supported card/payment types and payment functions that should be enabled for your account.
2.2 SAP System Requirements
- SAP digital payments add-on installed and configured on your SAP BTP (Business Technology Platform) tenant.
- SAP BTP Tenant ID and Tenant Subdomain obtained from the Digital Payments BTP administrator or SAP administrator / onboarding team.
- Access to the SAP digital payments add-on configuration UI (Administrator role required).
- SAP Data Center selected — this guide covers the US East (Virginia) data center.
Configuration Overview
Three phases to complete in order
Setting up UTA as a PSP for the SAP digital payments add-on involves three primary phases, which must be completed in the order listed below:
Account Setup
Configure your UTA and SAP accounts and gather all required credentials
Activate UTA as PSP
Enable UTA within the SAP digital payments add-on PSP Status UI
PSP Determination & Routing
Configure transaction routing rules so payments are directed to UTA
Step-by-Step Configuration
Detailed instructions for each configuration phase
Activate UTA as Payment Service Provider (PSP)
SAP will provide the URL for the PSP Status UI as part of your tenant onboarding. The URL is specific to your data center. For US East (Virginia), use the URL provided by your BTP administrator.
1a. Access the PSP Status UI
- Open a supported web browser and navigate to the PSP Status UI URL provided by SAP for your tenant.
- Log in using your SAP digital payments add-on administrator credentials.
- The PSP Status UI displays a list of available Payment Service Providers.
1b. Activate UTA
- In the PSP list, locate United TranzActions (UTA).
- Click the Activate button next to UTA.
- You will be prompted to enter your UTA API credentials. Enter the following:
| Field | Value to Enter |
|---|---|
| Client ID / Merchant ID | Your UTA-assigned Merchant ID |
| Client Secret / API Key | Your UTA API Secret Key from the UTA Merchant Portal |
| Environment | Select Production (or Sandbox for testing) |
| Data Center | US East (Virginia) |
- Click Save or Activate to confirm.
- The PSP Status for UTA should change to Active. If an error occurs, verify your credentials and retry.
PSP Determination & Routing Configuration
PSP Determination is the set of rules that SAP uses to route a payment transaction to the correct PSP — in this case, UTA. You must configure at least one route before payments can be processed.
2a. Access PSP Determination Settings
- In the SAP digital payments add-on administration console, navigate to PSP Determination.
- Click Add Route to create a new routing rule.
2b. Configure a Payment Route
Each route defines the conditions under which a transaction will be processed by UTA. Configure the following fields:
| Field | Configuration Value / Guidance |
|---|---|
| PSP | Select UTA (United TranzActions) from the dropdown |
| Merchant Account | Select the UTA MID created in Step 3 |
| Currency | Select USD (or your applicable transaction currency) |
| Company Code | Enter the SAP Company Code that should trigger this route |
| Payment Method | Select all applicable payment methods (Credit Card, ACH, etc.) |
- Click Save to activate the route.
- Verify the route appears in the Active Routes list with a status of Enabled.
Testing Your Integration
Validate your configuration before going live
Before going live, it is essential to validate your configuration using UTA's Sandbox (test) environment. This ensures that card registration, authorization, capture, and refund flows behave as expected.
5.1 Test Scenarios
Execute the following test scenarios to validate your integration:
| Test Scenario | Expected Result | Notes |
|---|---|---|
| Card Registration — Visa | Card tokenized successfully; token returned to SAP | Use UTA test card number provided by UTA support |
| Card Registration — Mastercard | Card tokenized successfully | Use UTA test card number |
| Authorization — Approved | Authorization approved; authorization code returned | Amount: $1.00 USD |
| Authorization — Declined | Authorization declined; error code returned to SAP | Use UTA test decline card |
| Capture / Settlement | Funds captured successfully following prior authorization | Must follow a successful Authorization test |
| Void / Cancellation | Authorization cancelled; no funds captured | Must be performed before settlement |
| Refund | Refund processed; confirmation returned | Must follow a successful Capture test |
| ACH (eCheck) Registration | ACH account stored (if ACH enabled) | Requires ACH enabled on UTA account |
5.3 Reviewing Test Results
- → Log in to the UTA Merchant Portal and navigate to Transaction Reports to verify that test transactions appear with the correct status.
- → If any test scenario fails, review the error codes returned and refer to Section 7 (Troubleshooting) or contact UTA Support Team.
Going Live
Switch to Production after successful testing
Once all test scenarios pass successfully, follow these steps to activate your live Production environment.
- Go to the PSP Status UI in the SAP digital payments add-on administration console.
- Enable the Production UTA environment setting.
- Add your Production Client ID and Client Secret from the UTA Merchant Portal.
- Save and confirm the activation.
- Process a small live transaction (e.g., $0.01 or $1.00) to confirm end-to-end production connectivity.
- Verify the transaction appears in the UTA Merchant Portal with a status of Approved and Settled (or Authorized, if using separate capture).
- Notify your UTA account representative that you have gone live so they can monitor your initial transactions.
✅ Go-Live Checklist
Troubleshooting
Common issues and their resolutions
The table below lists common issues encountered during configuration and their recommended resolutions.
| Issue | Likely Cause | Resolution |
|---|---|---|
| Activation fails with 'Invalid Credentials.' | Incorrect API Key or MID entered | Re-enter credentials from the UTA Merchant Portal; ensure no trailing spaces |
| Card Registration returns error | Card Registration is misconfigured or card type not enabled | Verify card type is enabled in UTA account and tokenization is enabled. |
| Authorization declined on all transactions | Sandbox credentials used in Production, or incorrect MID mapping | Confirm environment setting is Production; verify MID mapping in Step 3 |
| Transactions not appearing in UTA portal | Incorrect MID in mapping or routing misconfigured | Confirm MID entered in SAP matches the MID in the UTA Merchant Portal |
| Refund fails | Transaction not yet settled, or refund not enabled on account | Ensure transaction is fully settled before attempting refund; confirm refund is enabled with UTA |
UTA Support & Resources
Contact information and helpful links
Appendix A — SAP digital payments add-on: Supported Features Summary
The following is a summary of features supported by the SAP digital payments add-on when integrated with UTA as the PSP. This information is derived from the SAP digital payments add-on documentation for the US East (Virginia) data center.
| Feature | Supported | Notes |
|---|---|---|
| Card Registration | Yes | Credit Card and ACH |
| Pre-Authorization during Registration | Yes | Credit Card only |
| Authorization | Yes | All supported card brands |
| Authorization Cancellation (Void) | Yes | Prior to settlement |
| Settlement / Capture | Yes | Following prior authorization |
| Refund | Yes | Following settlement |
| Surcharges | Yes | Subject to UTA account configuration. Only available for card payments |
| Multiple MID Mapping | Yes | Per Company Code routing supported |
| Multi-Currency | Yes | USD primary; CAD also supported |
| MOTO / Virtual Terminal | Contact UTA | Must be enabled on UTA account; contact UTA support |
Appendix B — Glossary
Definitions of key terms used throughout this guide